3.1 The Graphical User Interface
This chapter provides an in-depth description of FEBio Studio's graphical user interface and how to interact with it. FEBio Studio configures its UI depending on whether you are building a model (the Build configuration), or whether you are analyzing a model's result (the Post configuration). In this chapter, the Build configuration is discussed as well as the UI features that are common in both configurations.
Overview
FEBio Studio has a powerful graphical user interface (GUI) that offers an intuitive approach to setting up a finite element problem. It has several components to it, and in order to make optimal use of FEBio Studio it is important that the user is familiar with GUI. Chapter 2 guides the user through the most important skills needed to manipulate the GUI. In this chapter we provide a more in-depth discussion of it.
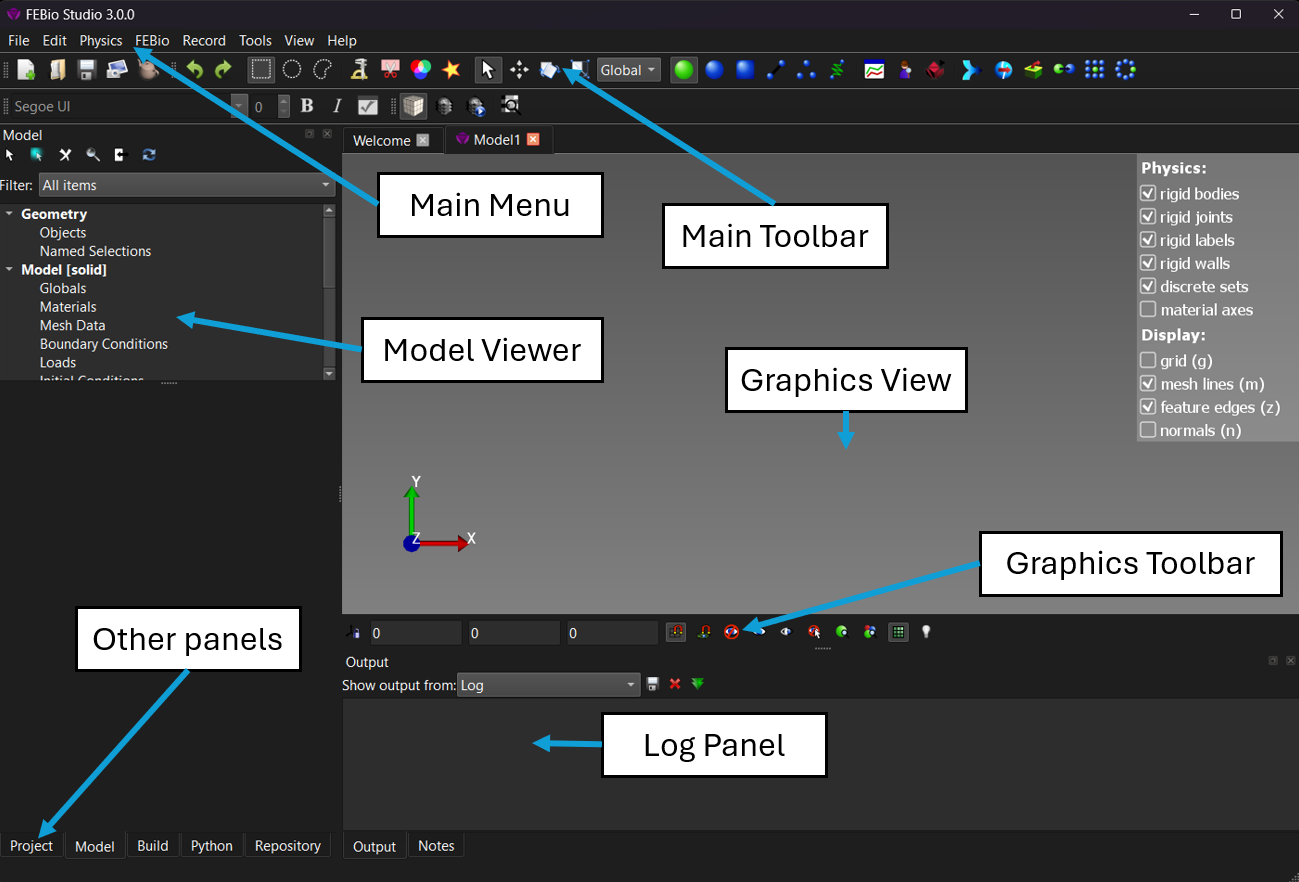
Figure 1. FEBio Studio's Graphical User Interface.
Figure 1 shows the FEBio Studio GUI and many of its most important components. The Main Menu bar gives access to most features such as file I/O, editing selections, setting up the physics, customizing the view and much more. The Main Toolbar provides an alternative way to invoke some of the most commonly used menu commands. It also has some buttons that affect the way the user interacts with the model. The Model panel shows a hierarchical overview of the model and its components. The Graphics View displays a 3D view of the model. The Status bar at the bottom of the screen displays some information regarding what FEBio Studio is doing. The Graphics Toolbar shows additional tools for interacting with objects and selections in the Graphics View. The Build panel has several child panels that are used to select the current active working context. The Create panel allows the user to create geometry, the Edit panel lists several options to select and edit the geometry. The Mesh panel collects all parameters that affect mesh generation. Finally the Tools panel offers some alternative editing tools.
Navigating the GUI
Navigating the GUI is done using the mouse. By holding down one of the three mouse buttons and dragging the mouse, the viewing position can be changed. The view can be rotated, panned (i.e. translated), or zoomed. The following table gives an overview of the different methods to change the view.
| Action | Standard Method | Alternative Method |
|---|---|---|
| Rotate | left mouse button | |
| Rotate in-plane | left mouse button \(+\) Alt key | |
| Panning | middle mouse button | right mouse button \(+\) Alt key |
| Zooming | right mouse button |
Table 1. Overview of methods to change the view.
In the following sections, the different components of the menu bar will be explored.